I will be honest with you. I had been borrowing my neighbor Patty's old Hovabator for two springs running, and every time I returned it I thought, I should just buy my own. Then I watched her hatch 19 out of 22 Buff Orpington eggs in March and that was the end of the debate. I bought the MATICOOPX 30-egg incubator in early April, loaded it with 28 eggs from my own flock, a mix of Olive Eggers and Easter Eggers courtesy of my three best layers, Roux, Clover, and a big Olive Egger named Juniper, and waited. Twenty-one days is a long time when you are checking a screen every few hours.
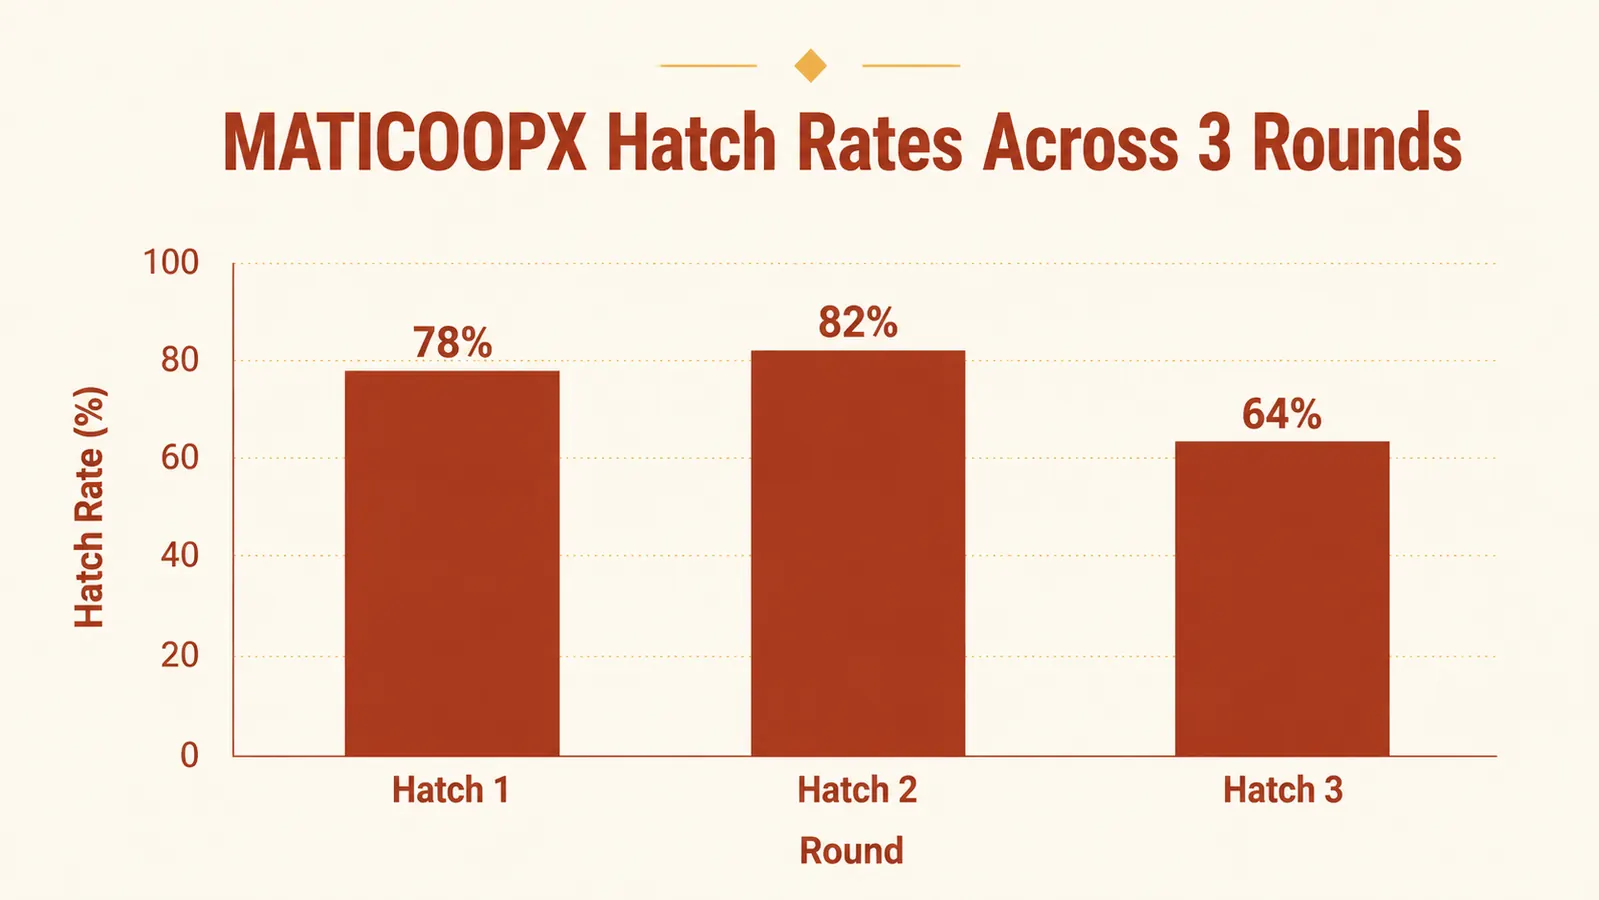
What follows is my account of three back-to-back hatches in this machine, spread across spring and early summer. I will cover what the humidity display is actually like to live with, what candling at day 7 and day 14 told me, how lockdown went, and what I would do differently. My hatch rates were 78%, 82%, and 64% across the three rounds. That last number has a story attached to it.
The Quick Verdict
Solid mid-price incubator with a genuinely useful humidity display. Hatch rates hold up well when conditions are stable. Turner is reliable and quiet. The plastic lid fogs slightly in humid climates, which makes seeing inside a little harder than it should be.
Amazon Check Today's Price →If you are tired of borrowing a neighbor's incubator every spring, the MATICOOPX is a good place to start.
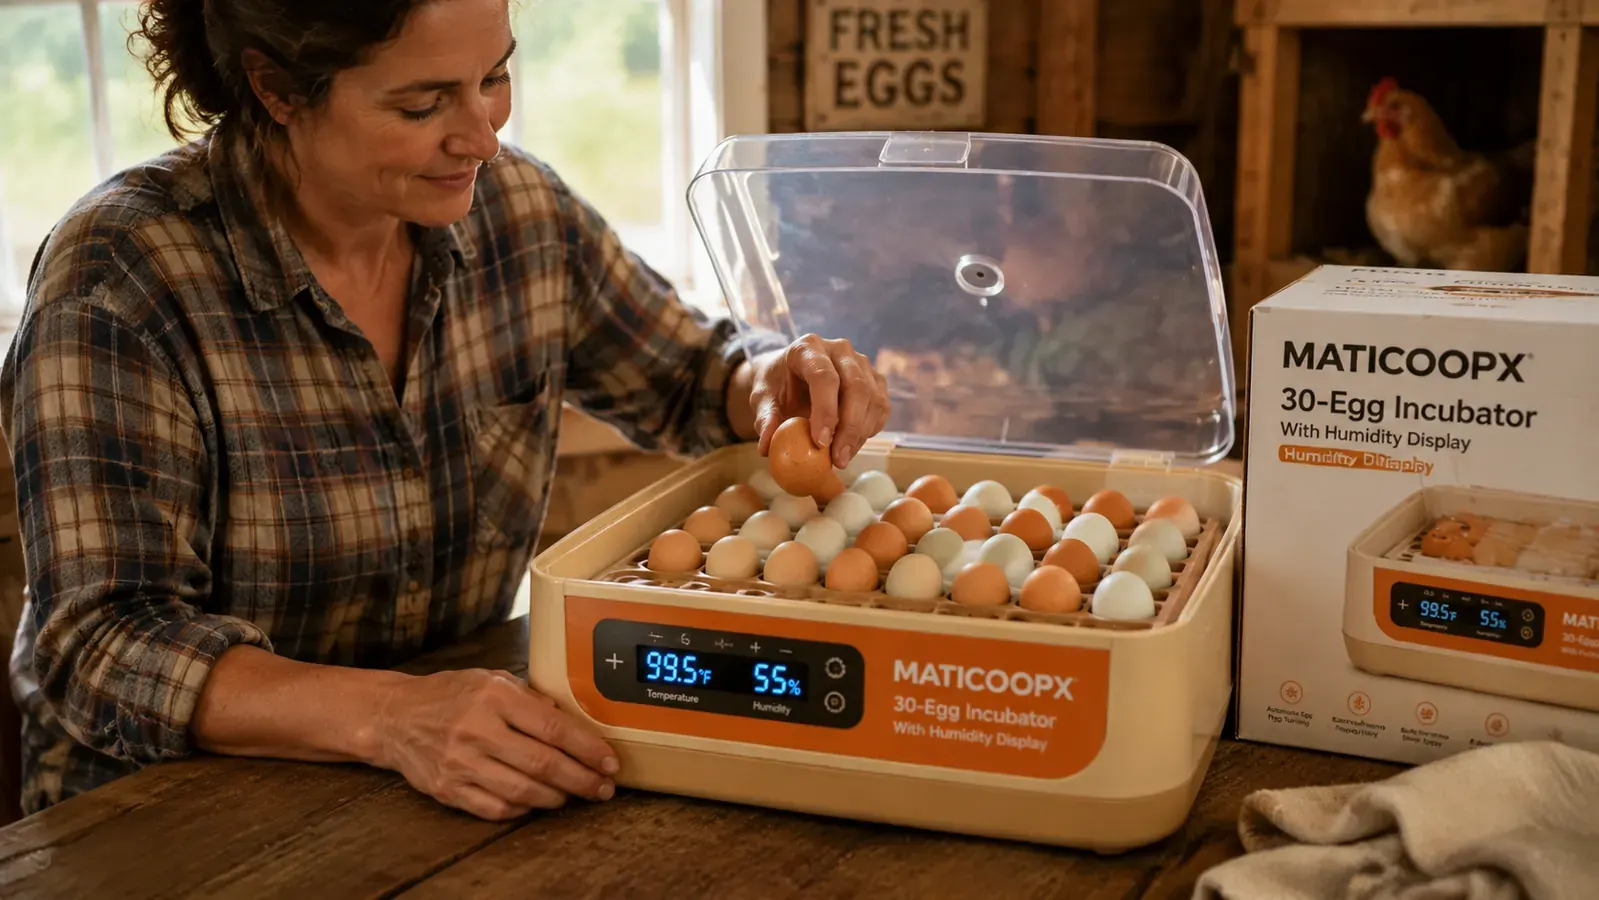
It holds 30 chicken eggs, turns automatically, and shows you humidity in real time so you are not guessing at one of the most important variables in hatching. I have run three rounds in mine and would buy it again.
Amazon Check Today's Price on Amazon →How I've Used It: Three Rounds, Forty Days of Data
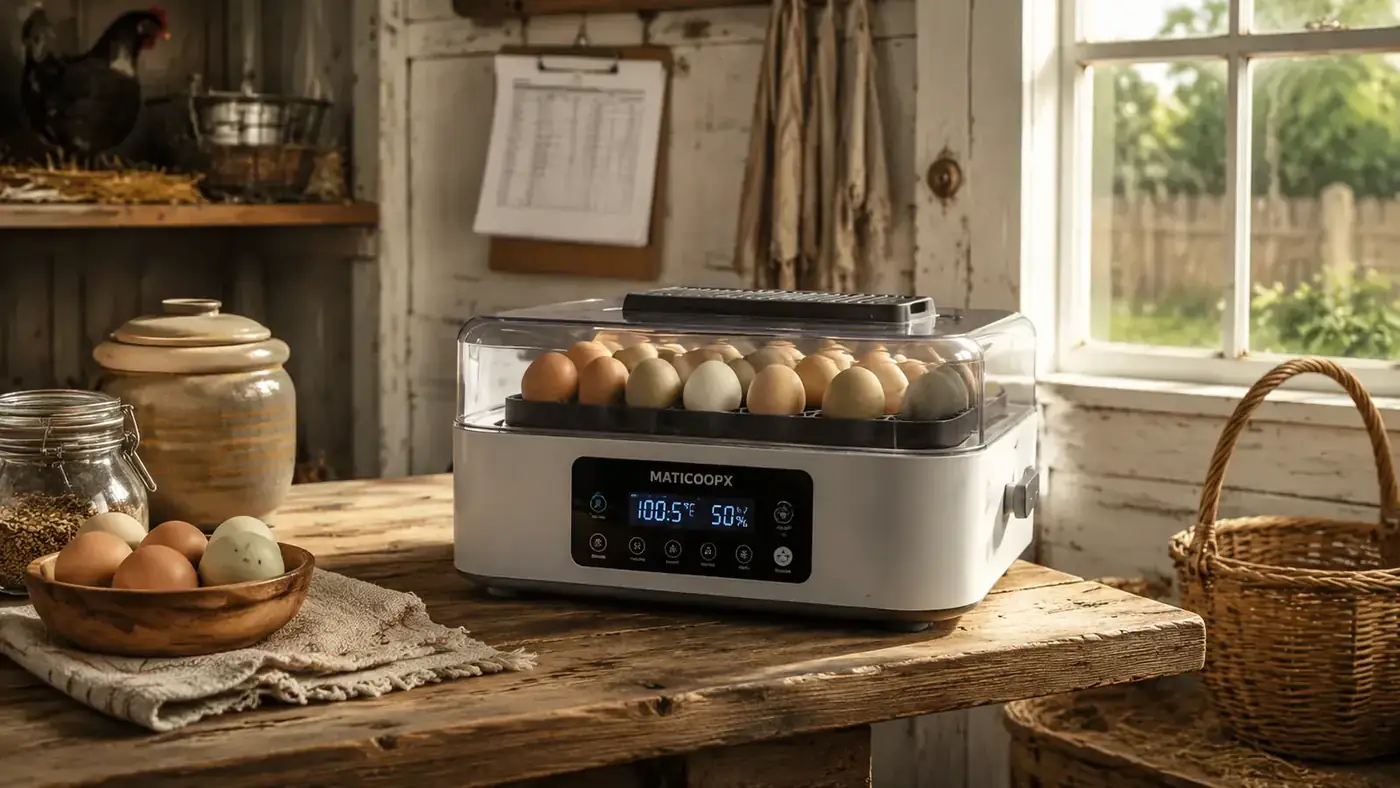
The MATICOOPX 30-egg incubator arrived in a solid box, all the parts bagged separately. Setup took maybe twenty minutes once I read through the instructions, which are printed in clear-enough English. The egg turner trays pop into the frame and connect to the motor at the back. You fill the water channel in the base, close the lid, and let it stabilize for a few hours before you add any eggs. That is the step I would emphasize to anyone starting out: give the machine a full three to four hours to settle at target temperature before you commit eggs. Mine wandered from 97.8 to 99.6 in the first two hours before it calmed down to a steady 99.5. Normal. Just wait.
For hatch one I set 28 eggs. Roux is a two-year-old Easter Egger who lays gorgeous blue-green eggs, and her eggs are a little pointier than average, which I was curious about in the turner slots. They fit fine. Clover's big brown eggs and Juniper's olive-green ones filled out the rest of the tray. I had a rooster, my big Ameraucana mix named Biscuit, who had been with the hens for six weeks by then, so fertility should have been good. I put the incubator on my potting bench in the corner of the garage where temperature stays consistent.
Hatch two I went with 24 of my own eggs plus 6 Silkie eggs I picked up from a local breeder. Hatch three was all Silkies from the same breeder, 30 eggs, and this is where things got complicated.
The Humidity Display: What It Actually Tells You
The front panel shows temperature and humidity simultaneously on a two-line digital display. The humidity reading is what sold me on this model over the cheaper options. Most sub-$80 incubators give you a temperature dial and nothing else, and humidity is half the battle in hatching. Too low and the membrane dries out and chicks cannot turn inside the egg. Too high and they drown before they pip.
For the first 18 days I was targeting 45 to 50 percent humidity. The display let me track this without opening the lid, which matters because every time you crack the lid you lose heat and humidity both. My garage tends to run dry in early spring, around 30 to 35 percent ambient, so I ended up needing to add water to the channel every two days. The display told me exactly when the channel was running low because humidity would drift down to 38 or 39. I refilled it and watched the reading climb back up within an hour. That real-time feedback is worth a lot.
One thing I noticed: the sensor reads the average humidity inside the chamber, not the humidity immediately around each egg. If you stack a lot of condensation near the vent holes, the reading can be a degree or two optimistic. I confirmed this by double-checking with a separate $12 hygrometer I put inside for the first week. They tracked within 3 percent of each other, which is close enough. After the first hatch I trusted the built-in display and put the external hygrometer away.
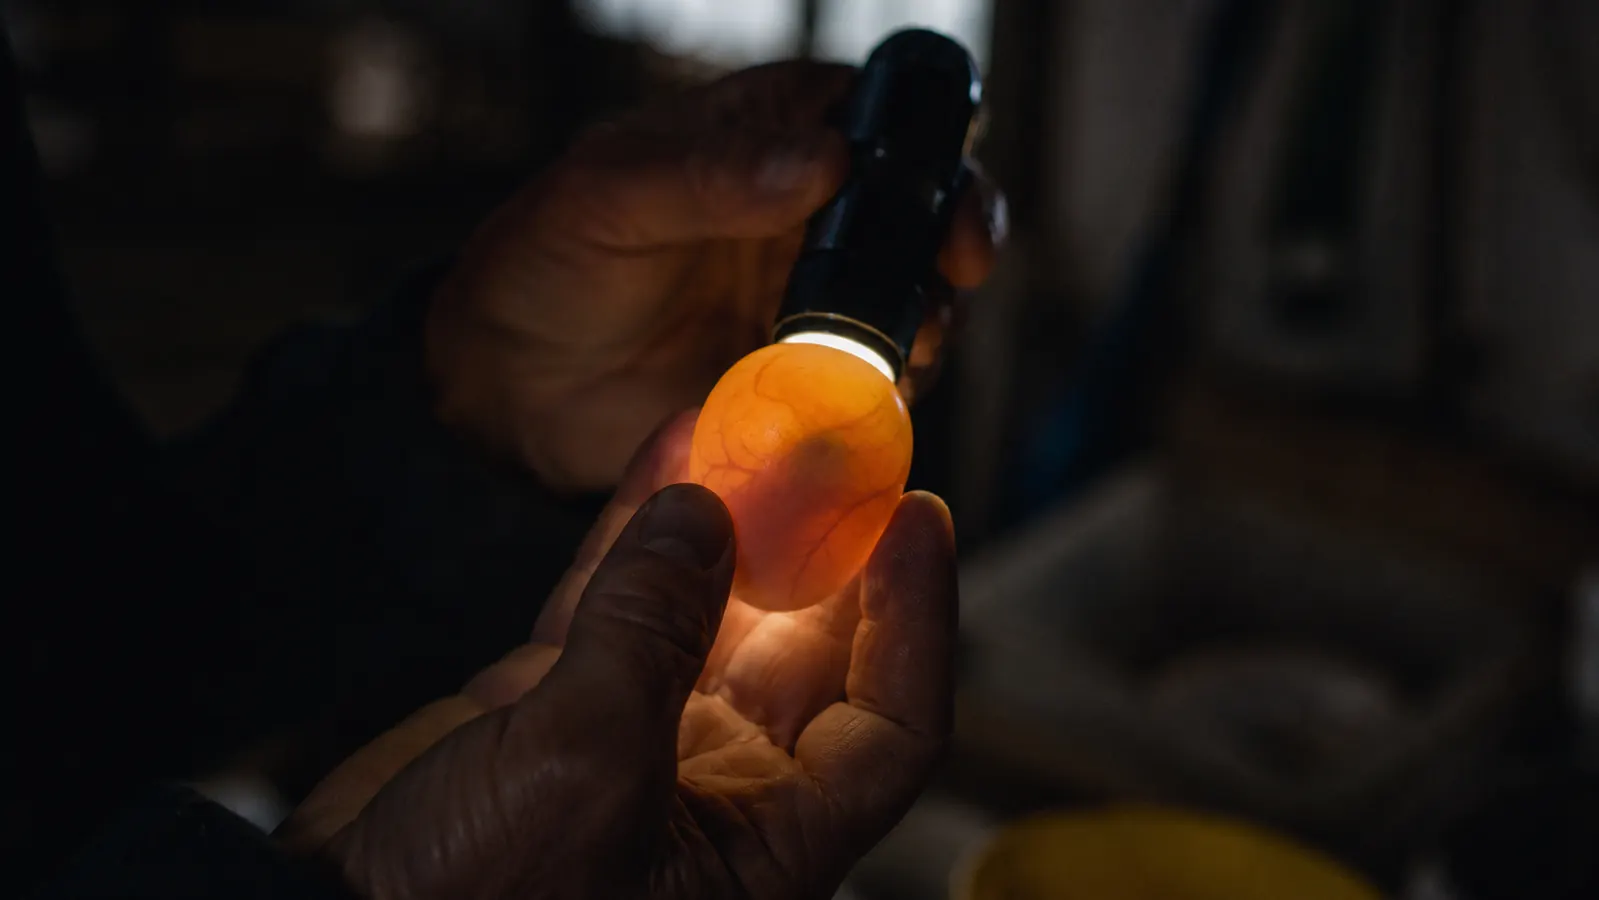
Candling at Day 7 and Day 14: What I Saw
I candle twice: once at day 7 and once at day 14. Day 7 is for pulling obvious clears and quitters, and day 14 is a final check before lockdown. On hatch one, day 7 showed 4 clears out of 28 eggs. Those came out. On day 14, I found 2 more that had quit between day 7 and day 14, which happens. I went into lockdown with 22 viable eggs and ended up with 17 hatched chicks. That is 77.3 percent of eggs set, or roughly 78 percent of what I put in.
Candling Roux's blue-green eggs was harder than the brown and olive ones. The darker shells let less light through, and the blue-green tint adds an extra filter. I used a dedicated egg candler from another brand, not the one included with the MATICOOPX, because the included candler is a small penlight that works fine for white shells but struggles with anything darker. If you hatch a lot of colored-shell eggs, grab a brighter candler. That is not a knock on the incubator itself, just something to know.
Going into lockdown with 22 eggs and coming out with 17 chicks was better than my first hatch with Patty's borrowed machine. I called it a win.
Lockdown: Day 18 Through Hatch Day
Lockdown starts on day 18 and it is the hardest part. You remove the egg turner trays, lay the eggs flat on the wire mesh floor, raise humidity to 65 to 70 percent, and then you do not open the lid for anything until the last chick is dried off. The MATICOOPX makes lockdown humidity easy because the water channel holds enough water to keep humidity elevated for 48 to 60 hours without a refill. On hatch one I refilled once on day 20 through one of the small vent holes using a turkey baster. The display stayed in the 65 to 68 percent range the whole time, which is exactly where you want it.
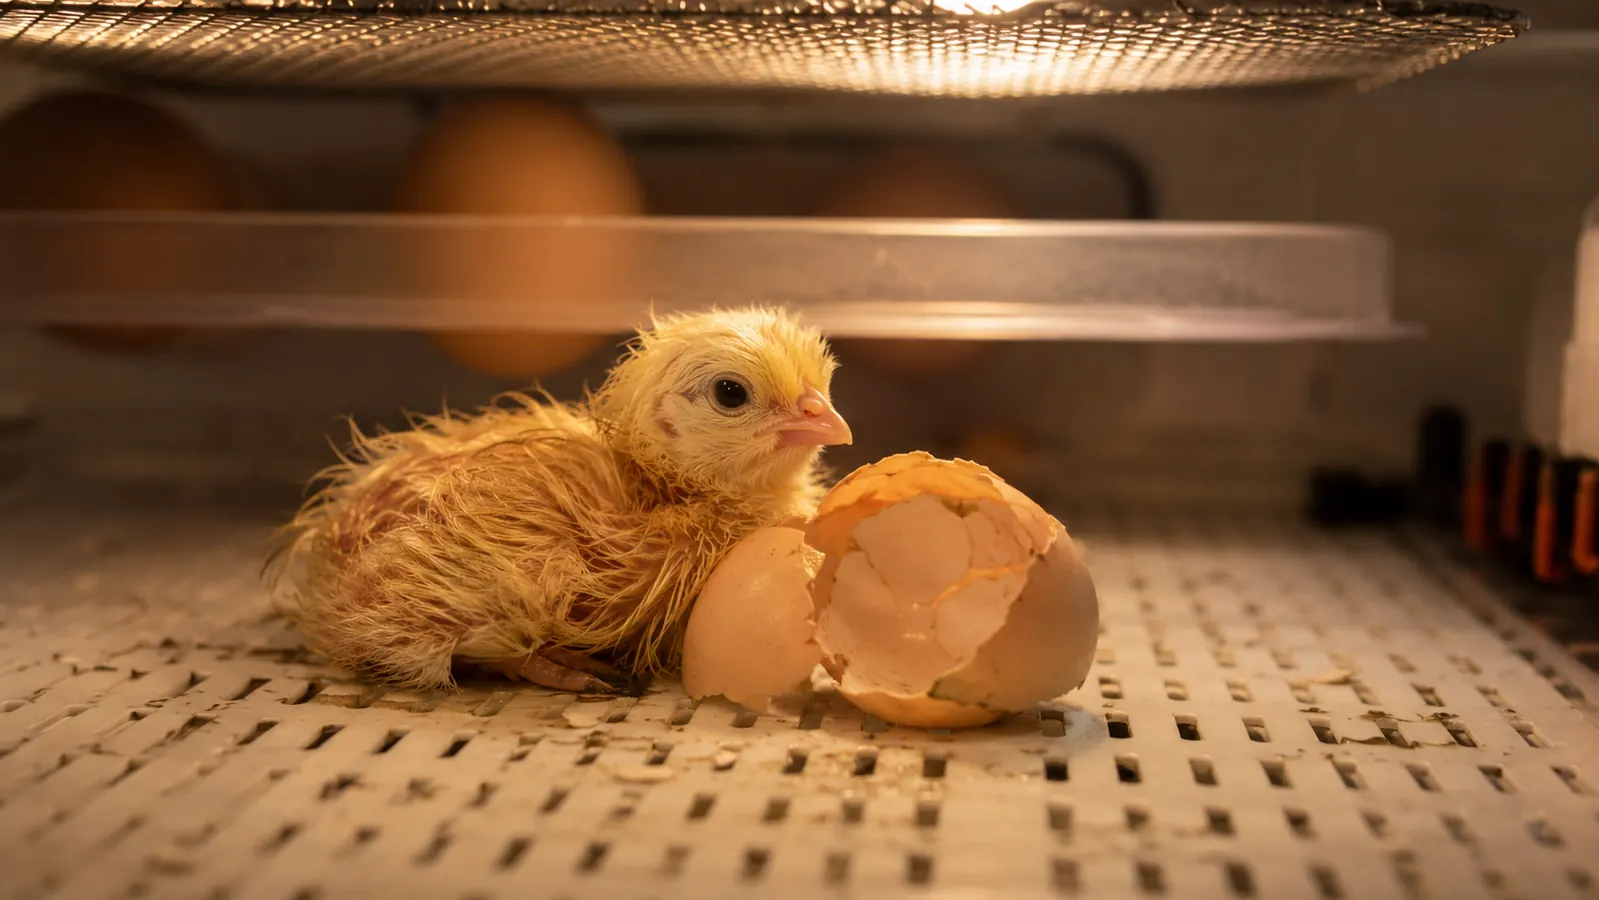
The first pip showed up on day 20 at around 9pm. I was watching a movie and glanced over at the incubator on the kitchen counter, where I had moved it for the last three days so I could watch without walking to the garage constantly. By midnight I had three active pipers. By morning on day 21, twelve chicks were out and five were still working. Two of those five made it by mid-afternoon. I lost three eggs that went to day 21 and never pipped. I cracked them after 48 hours and one was a fully developed chick that just did not make it out, which is hard to see but not unusual.
Hatch Two and Hatch Three: Where It Got Interesting
Hatch two was my best round. 24 of my own eggs plus 6 Silkie eggs from Rose, a local breeder who lives about twelve miles out. Out of 30 eggs total, I went into lockdown with 26, and 24 hatched. That is 80 percent of eggs set, or 82 percent if you exclude infertiles I confirmed on day 7. The Silkies from Rose all hatched. Those fluffy little messes were worth every bit of the extra attention their smaller eggs require.
Hatch three was a lesson. I agreed to hatch 30 Silkie eggs for Rose because she needed the chicks and her own incubator had a failing heating element. The eggs arrived at my house in a cooler after a 90-minute drive in July heat. I let them rest point-down for 24 hours before setting, exactly as recommended. Humidity that week was a problem I had not faced before: outdoor ambient humidity in my area hit 80 to 85 percent during a heat wave, and my garage was reflecting that. The incubator's humidity display kept reading 70 to 75 even without adding water. I opened the vent holes all the way, which helped, but I could not get it below 62 percent for most of the first two weeks. That is too high for the development phase.
I ended up with 19 out of 30 hatched, which is 63 percent. Some losses were almost certainly due to the shipped-egg handling. Some were the humidity issue. I should have used a dehumidifier in the garage. I did not have one. If you live somewhere humid and you are planning to hatch in July or August, get a small dehumidifier for the room where the incubator lives. The machine did what it could. The environment was working against it.
The Automatic Turner: Quiet, Reliable, One Catch
The automatic egg turner rotates the trays through a slow rocking cycle, roughly every two hours. It is quiet enough that I slept with the incubator on my bedroom dresser during lockdown on hatch two without any trouble. The motor has a gentle hum, not a click or a grind. Over three hatches, meaning 63 days of turning total, it never once skipped a cycle or got stuck. That is better than I expected for an incubator in this price range.
The one catch: the egg slots are sized for standard large chicken eggs. Jumbo duck eggs will not fit without adapters, which MATICOOPX sells separately. Bantam eggs or very small pullet eggs will sit loosely and can rock more than they should. I shim small eggs with a small strip of foam cut from packaging foam, tucked alongside the egg in the slot. It takes two minutes and solves the problem completely, but it is worth knowing ahead of time.
What I Liked
- Humidity display is accurate and genuinely useful, saves you from guessing
- Automatic turner ran reliably across 63 days of total use without skipping once
- Holds 30 standard chicken eggs with room to spare
- Water channel holds enough volume for 48 to 60 hours without a refill during lockdown
- Digital temperature readout holds steady once the machine is calibrated
- Setup is straightforward, takes about 20 minutes with the instructions
Where It Falls Short
- Clear plastic lid fogs in humid climates, making it hard to see inside without opening it
- Included egg candler is underpowered for dark-shelled eggs
- No alarm if temperature or humidity drifts out of range overnight
- Egg slots are sized for standard large eggs only, bantam and jumbo sizes need shimming or adapters
- No Wi-Fi connectivity or app monitoring, you are checking the display manually
What Surprised Me
Two things surprised me. First, how much steadier the temperature held compared to my neighbor's old Hovabator. Patty's machine swings plus or minus 1 degree regularly, and I spent two springs stressing about temperature spikes. The MATICOOPX settled to within 0.2 degrees of target by hour six and stayed there. I checked with a calibrated thermometer I borrowed from the kitchen. Steady temperature is underrated. Chick development depends on it.
Second surprise: how small hatch day actually is in the physical sense. I expected a big chaotic event. What I got was a gradual rolling process that happens over 12 to 18 hours. The first pip, the wait, the zip, the flop, and then a wet little mess that dries into a fluffy chick in about an hour. Watching the humidity display hold steady through all of that was genuinely calming. I knew the environment inside was right. All I had to do was wait.
Who This Is For
This incubator is the right tool for backyard keepers who want to hatch their own stock and are tired of borrowing equipment or relying on a broody hen that may or may not cooperate. It is also right for anyone who wants to expand a flock quickly, hatch eggs from a specific breeding pair, or give kids the experience of watching an egg become a chick. At this price point with this feature set, it is one of the better options for someone hatching a few times a year, not a commercial operation but more than a one-time experiment.
Who Should Skip It
If you are hatching duck or goose eggs, or a lot of bantam eggs, look at incubators with adjustable egg slot sizes or ones that come with multiple tray formats. If you want app monitoring or alerts when the temperature spikes at 2am, this machine does not have that and neither do most incubators in this price range. If you are in a high-humidity climate and hatching in summer, the humidity display becomes less useful because ambient humidity does the work for you, and you may need active dehumidification regardless of which incubator you use.
For more on how to set up your first hatch step by step, including how to handle eggs before setting and what to do if a chick is slow to zip, see my guide on how to hatch eggs when your hens refuse to go broody. And if you are weighing this model against the Nurture Right 360, I break down the differences in detail over at my MATICOOPX vs Nurture Right 360 comparison.
Three hatches in, I would buy this incubator again without hesitation.
The humidity display alone is worth it over cheaper options that leave you guessing. If you are ready to stop borrowing equipment and start hatching on your own schedule, check the current price on Amazon and see if it fits your budget.
Amazon Check Today's Price on Amazon →